Saturday, April 8, 2023

Evolution of an OLD pattern

 This is a cross-shaped bookmark that I have been tatting for more than 50 years. I believe that this pattern was originally found in an old Work Basket. The pattern is unusual because the rings are on the exterior portion of the cross members and the chains are the "foundation or framing" for the cross members. 

I like making this pattern using Size 80 thread by winding two different colors (such as a colorway [either variegated or ombre] together onto a single shuttle. Other combinations can be a colorway for the rings and a solid, complimentary color for the chains or vice versa. To finish out the original pattern, the instructions called for the crafter to cut an appropriate length of narrow ribbon to feed through the joins of the chains both horizontally and vertically.

All the exterior rings start with a base of 3 - 3 - 3 - 3 - 3 - 3 or 3 + 3 + 3 - 3 - 3 with the joins made to the adjacent picot of the previous ring. Reverse work. [Note here, if using two threads together on the shuttle, be sure that the joins pick up both threads of the picot.]

All "interior" chains are either 3 - 3 or 3 + 3. Reverse Work. The corners that turn the 90-degree corners are Ch 3 - 4. RW R 2 + 1 + 1 - 1 - 2. RW Ch 4 - 3. As you come back on the other side, join the chain picot to the adjacent picot on the previous corner.

All end chains (at the end of the cross members are Ch 5. RW.

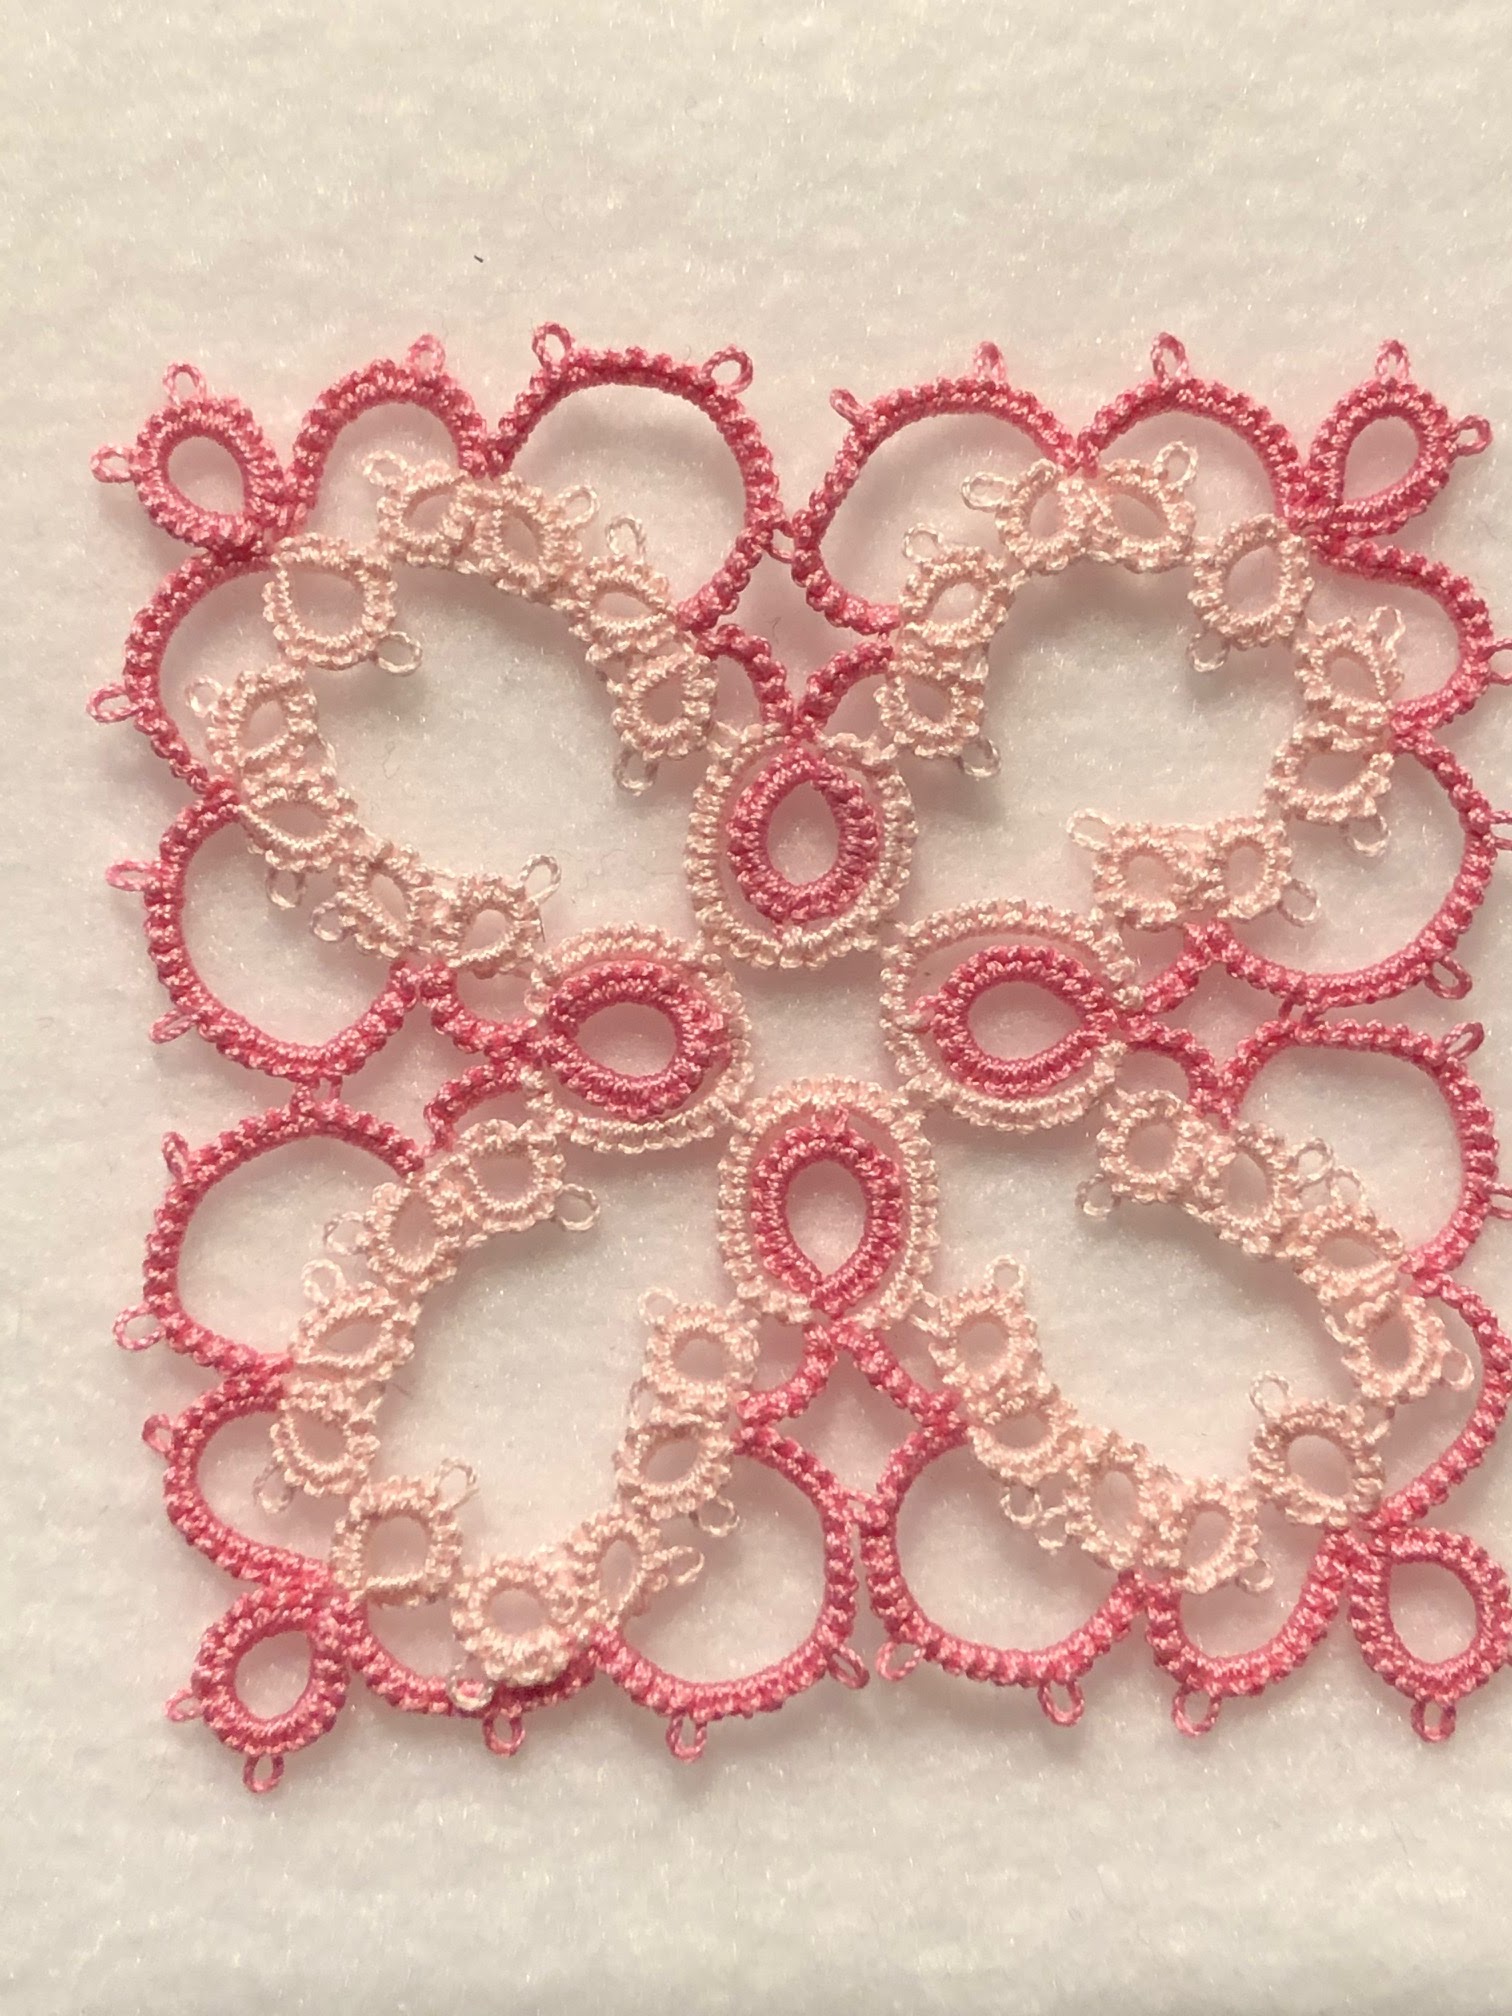
To explain the progression, let's look at the five samples in the picture below.


The Red Cross is tatted in traditional style with all stitches, regardless of the element; i.e., all double stitches (slip 'n slide method) are 1st Half: under, over, flip to the core thread then 2nd Half: over, under, and flip to the core thread. All joins are up-joins and do not count in the stitch count of the ring or chain elements. I used a lock-stitch chain to thread between the joined chains to mimic the ribbons from the original pattern. The tassel was created using this YouTube video but I only used two sets of 15 rounds (length-wise) on a Boye 7570 yarn bobbin - from my stash of accessories as that model seems to have been discontinued).

The Blue and White cross is tatted fully front side/back side. The same stitch counts and progression but the joins (down-joins on FS and up-joins on BS) count in the stitch counts as the 1st half of the next double stitch. You may notice a slight difference in the overall size of the piece. Using this method of tatting gives a piece about 12% smaller than tatting traditionally. The white thread for the chains mimics the ribbon of the original finishing instructions with extra threads cut, attached to the final end chain with a luggage tie, and pulled snugly against the chain to create a tassel.

The next two pieces represent a commission of work from my hubby. He wanted a patriotic-colored cross with distinct colors rather than a variegated colorway of the three colors associated with the USA (Red, White, and Blue). Both are tatted FS/BS but the first tri-color (approximately at the 4:00 o'clock position in the picture) uses self-closing mock rings (SCMRs). Close inspection of the piece (not readily visible in the picture) will give a blip of color at the base of the Ring.

The second tri-color uses single-color rings for all rings and simply alternates colors. For both of these crosses both the Blue and White threads are carried in the chain core creating a padded chain. I did NOT reverse the work on either of the two tri-colors but used the chain thread (red) to wrap unflipped stitches (as RODS) onto the two core threads. Both crosses were worked on the FS which necessitated a lock join to join the chains. For the SCMR style, I wanted the small corner rings to be Red (the same color as the chains); this called for an SLT with the two core threads and chain color before and after the small ring. To finish the crosses, I cut additional threads of all three colors, tied them to the last chain, separated all three colors distinctly, and braided them. Finishing this tassel with a simple overhand knot.

It is interesting to experiment with other tri-color combinations. A thought that comes to mind is to use a colorway, ombre style then select two solid colors that either complement or contrasts those colors in the colorway. For two-color combinations, a variegated colorway paired with white will always work beautifully. Pair the variegated colorway with black and a stained glass look will appear. 

Just for definition's sake (and why I use the terms I do):

Colorway - A color or arrangement of colors.

Variegated (adjective) - Having discrete markings of different colors. Synonyms include multihued, polychromatic, kaleidoscopic

Ombré (adjective or noun) - Having colors or tones that shade into each other.

Generally, colorway describes any thread, yarn, or fabric where the dyeing process leads to an arrangement of distinct colors. The terms (Variegated and Ombré) are more specific and can be used as adjectives when describing a colorway. Colorways work best for me in small pieces but if the repeat is suitable to a larger piece and the tatter pays attention to detail, especially when adding a thread, the result is stunning!

The final cross in the picture (upper left) is a Variegated colorway (Lizbeth 164 - Blue River Glades) with the chain using a complementary color (Lizbeth 675 - Fern Green Medium). The thread size for all of the crosses is 20. I did have to adjust my tension especially on the tri-color crosses as there were distinct differences in diameter among the red, white, and blue colors. I determined up front to use the red for the chains since it is a very strong color and always draws the eye. 

Wednesday, February 22, 2023

Magic Squares with FS/BS Tatting

My thoughts on Front-side / Backside tatting continue with this post to discuss color. Around 25 years ago, in one of the online chat groups (perhaps eTatters on Yahoo Groups), we were discussing and playing with the Magic Square concept of creating a "fabric" of tatting that would eliminate as much as possible the number of ends to hide. I probably have among my multitude of UFPs (UnFinished Projects) several magic square projects.

The picture below is the Clarke Magic Square from Roselyn Hobbs (her Etsy shop is named UrbanKnotDesign). Roselyn's original model is photographed with black thread. This pattern works up really quickly ... except when I looked back and realized I had left out a picot and set of double stitches on the "corner" floating ring or joined to the wrong set of the interior, small rings. I spent more time retro-tatting I think than I actually did tatting.


I had fun with this one as I wanted to play with color. The above picture is by no means a finished piece as it is only finger-blocked directly off my shuttles. The rings in the interior of the motifs are Lizbeth 20 (Mocha Brown Dk - #692). The chains and the rings off the chains (aka floating rings or thrown-off rings) are Lizbeth 20 (Pink Blossoms - #176). When I selected these colors, I was seeing crocus flowers from the earth. I also know that my tension is better when I tat on the front side for chains. This one was also an exercise in dealing with slightly different diameters of the thread due to the inherent differences between dark-colored thread and colorways. There are even differences in diameters sometimes along a colorway as it changes hues. Once I have blocked this and photographed it in good light on a neutral background, I will be really pleased with the results.

Just a couple of construction notations that work for me. Since I wanted the interior rings to be tear-dropped shaped and they were tatted on the backside as RODS, I dropped the shuttle through the ring (back to front) before closing the ring. I didn't fuss overly much when adding a new thread for the colorway but I did find that adding the thread where I tat-over-tails in one of the larger rings was very helpful. My picot gauge was a large, vinyl-covered paperclip that I had straightened and used in the horizontal (parallel to the core thread) position. 

The joins on the solid-colored rings were counted as the first half of the next double stitch. Since this was on the backside of the ring, the join was an up-join followed by a "d" half stitch. The "s" and "d" half stitches until the required number of double stitches was accomplished. 

For the joins on the colorway (which are front side tatting), all joins were up-joins and NOT counted in the stitch count. Additionally, the shuttle was dropped through the ring (front to back) for the floating rings as I wanted a rounder appearance for those rings. By dropping the shuttle through, the shuttle also goes to the proper orientation for the chain work.

More discussion on color involves just a change of color position. If you look at the two examples of Robin Perfetti's Onion Ring Magic Squares, the color selection for the smaller rings makes a real statement as to the appearance. For the pink one, the pale pink interior rings nearly disappear into the background. The blue-toned one uses navy blue for the interior rings which is a stark contrast to the blue colorway. 


Friday, February 3, 2023

FS/BS Tatting - More thoughts

 This post will share some of the techniques that I've found work for me when tatting using the Front Side / Back Side method. As I do (and have done) with any project, I try to plan ahead. If I have a pattern in hand, my first decision deals with thread size for the use of the project I am planning. Then I need to decide whether it will be a single color, a series of monochromatic colors, or just whatever strikes my fancy. Then, it's off to the stash of that particular size (I do have most of my thread segregated in bins by size) to see if I have enough thread or the colors I thought about. Sometimes, of course, I have to make different selections of colors. Most of the time, the size won't change because I have a specific use in mind. Once the threads are selected, I see what shuttles are "speaking" to me for the particular project. I know this may seem strange to you but my shuttles and thread along with the pattern will tell me which shuttle type is best; i.e., post or bobbin, and with or without a point or hook. These are thoughts about how to do FS/BS tatting but do not include exact "how-to's" for any technique as there are glossaries, blog posts, and other online articles from many sources that discuss those mechanics.

Before I begin to wind shuttles to make a single stitch, I make a copy of the pattern (for my own use; this is NOT a violation of copyright) and read through it thoroughly. I will make initial notes on my copy; sometimes I will even write the pattern in more modern notation if it is one from the 1920s to 1960s. I then look at the entire piece again, picture and/or diagram, to determine whether I am tatting this in the traditional manner or whether I want to put in the effort to create a stunning piece that is FS/BS. I keep the copy with all notes (before, during, and after tatting) in a journal and reference it to the original, especially if the pattern is in one of my books. 

If the piece is made predominately of rings, then the rings will be tatted in traditional ds mode and be the dimensional feature of the front side. Where the "d" is the first half (slip and slide method) meaning it is under, over, and flipped onto the core thread. That makes the "s" the second half which goes over, under, and flipped onto the core thread. If the piece has mostly chainwork (an example is the square pinwheel pattern from Dora Young's All New Knotless Tatting Designs), I will use the chains as my frontside as my tension on chains is more even this way; therefore my rings will be on the backside and tatted using Reverse Order Double Stitch (RODS or sd).

FRONT SIDE / BACK SIDE - generally
If the piece is all one color, joins on the front side of the work will be Down Joins and count as a first half or "d" then followed by a second half or "s." This type of join was once referred to as a Dem-Rice join as it was popularized in the 1990s by Bobbie Demmer and Marie Rice (IOLI Journal, Fall 1993). Through Bobbie's research (probably due to the GLLG Tatting Teacher Certification Program), she learned that the down join had been used by Pat Perry and decades before that by Anne Orr. Most likely, its roots go back further and therefore the technique is known simply as a Down Join.
Conversely, if I am working on the back side of the work, the joins are Up Joins and again count as the first portion (an "s" in this case) followed by a "d." This "rule of thumb" is followed throughout the work regardless of the type of element joined. Both types of joins (UP  or DOWN) will allow the stitches to slide along the core thread. Being able to slide the double stitches along the core thread allows the tatter to evenly distribute all the double stitches (ring or chain) evenly.
Lock joins can be tricky but I find that I like pulling my lock joins to the back rather than to the front.
If the rings are the FS, they are all tatted "ds" but if there are rings that are tatted from the back side, they are tatted in RODS ("sd"). All chains on the backside are tatted RODS and if they fall on the front side, the "ds" order is followed.
Above all, I do my very best to be consistent and that action contributes to the overall beauty of the piece. The easiest explanation of the differences I know is to look at the tatting from the "edge" of the work. For traditional, a Ring-Chain-Ring combination will look like this:
R: ----v----v----v----. Ch: ----^----^----^----. R: ----v----v----v----.  ("v" or "^" are picots (the point of the character indicates which direction the picot will curve, "-" is a double stitch as ds, and a period(.) indicates the end of the element where the work will be reversed)
For the Front Side / Backside, the same Ring-Chain-Ring combination would look like this:
R: dsdsdsds v dsdsdsds v dsdsdsds v dsdsdsds. Ch: sdsdsdsd v sdsdsdsd v sdsdsdsd v sdsdsdsd.
R: dsdsdsds v dsdsdsds v dsdsdsds v dsdsdsds. For clarification, there is no spacing except for the written illustration here of the direction that the picots will point in relation to the double stitches. You will notice that all the picots "point" in the same direction. In my previous post, I used the analogy of viewing your hands.

SPLIT RINGS - the mental exercise of FS/BS tatting
The reason many tatters do not like FS/BS, I think, boils down to the mental exercise required for split rings ("SR") if any are required to be on the backside of the work. Split rings on the front side are pretty easy and don't really require a lot of thought ... just practice. BTW, my preferred method of doing an SR could be termed a modified "dead spider" as I simply tilt my pinch hand slightly away from my body; the top portion of the thread around my hand is in the line of progression (clockwise for me) and the stitches are flipped. Any stitches below the line of progression (below my thumb or on the 'bottom' portion of the ring) get the wrapped or unflipped stitches (counter-clockwise). BTW, whenever I close a ring, whether I drop the shuttle or not, I keep the ring in my pinch snugly to help guide it closed as I draw up the core thread.
The stitches completed in front of the slash ("/") mark are flipped and the unflipped stitches after the "/" are wrapped in RODS. When the SR is closed, the appearance is full double stitches throughout the entire ring. One of the biggest challenges I find for myself is that my wrapped (unflipped) stitches tend to be tighter onto the core thread than my flipped stitches and this deals with tension. For my split rings to be the same size as other rings (with the same stitch count), I need to concentrate a bit more to NOT wrap those unflipped stitches so tightly. 
The challenge of FS/BS in combination with SRs is that any tatted on the back side of the work are RODS. Not so difficult are the flipped stitches on the BS split ring as they are RODS and do not require a great deal of thought. For the unflipped stitches, however, I always have to stop, think where I am, and do them wrapped (unflipped) in the "ds" sequence. I cannot begin to relate to the reader how many split rings I have retro-tatted because I failed to take notice of the position and sequence.ll

Additional but not last thoughts on tatting, generally!

Thoughts about ring shapes. 
  1. You can give your rings two general, basic shapes. If you want your rings to have an oval (or teardrop) shape, on the front side of the work, do NOT drop (or post) the shuttle through the rings before closing. Keep the ring in your pinch so that you can guide the ring closed and prevent that last or first half stitch from unflipping and forming a lock stitch. If you are on the back side and want the oval shape, DROP the shuttle through the ring before closing.
  2. If you want a rounder-shaped ring (front side), drop the shuttle through the ring before closing. This action makes a ring easier to open (if you need to do so) and can help more 'aggressively' prevent a half stitch from unflipping and therefore creating an unwanted lock stitch. If you are on the back side, do not drop the shuttle through the ring.
  3. Depending on your pattern, both shapes of rings can be used effectively with attention to detail and overall appearance. 
Other "technical" suggestions have worked for me. 
  1. If I have more than a single ring before transitioning to a chain, I use teardrop-shaped rings. This keeps the bases of the rings closer together and helps in controlling "gaposis" between ring and chain elements. This action is especially helpful for clover or trefoil series of rings.
  2. On Split Rings, I will only drop the working (core thread) shuttle only through the ring for rounder shapes.
  3. I have begun using my thumbnail with each half-stitch to 'set' the stitch in place along the core thread. It took a little practice at first but really helps the look work in progress and eases some of the onus of blocking.
Joins for tatting with two or more colors can be tricky. 
  1. One of the first decisions for you is whether the joins and the consequent "color blips" a part of the design features or are merely construction aids. If the color blips are to be minimized, do Up Joins on the FS and follow with full double stitches; i.e., joins are NOT included in the stitch count. Tatting on the backside has Down Joins followed by full double stitches. If however, you want the blips as part of the design effect, use Up Joins and full double stitches following the join on the front side and Down Joins followed by full double stitches on the backside. Sometimes, the best way to go forward is to tat some samples to determine how to implement the look you envision.
  2. There are several other joins that could be used to minimize color blips but you need to determine how to journey forward and what will work best for you. You should also familiarize yourself with the major construction on any join whether the join creates a lock join (interrupts the core thread) or allow the double stitches to slide along the core thread.
Additional thoughts:
  1. Be cognizant that there are many techniques in our digital world that have different names reflecting different cultures and languages but are rediscoveries of older and well-established techniques sometimes with simpler, more descriptive names.
  2. Whenever I need to do a split chain, honestly I consult Judi Banashek's Impeccable Tatting, (c)1995, pg 43. This information was also published by the Ring of Tatters (with Judi's permission) in their Autumn 2000 Newsletter, pg 43. Note that this is generally the same as Dora Young's Knotless Method.

Tuesday, January 24, 2023

Thoughts on Front-Side / Back-Side (FS/BS) Tatting

 First of all, this is my preferred style of tatting. When I was that lone tatter in the panhandle of Texas saving a Dying Art, I "discovered" what I termed as "Technical Tatting." Bear in mind, this was LONG before home computers and certainly before the internet ... somewhere around 1973. The only resources I had available were a book in the library (Elgiva Nichols' 1962 book entitled Tatting: Technique & History) which I couldn't check out. I also had the start of my personal library: a Coats & Clark' Learn to book and DMC's 1965 Tatting. None of the books I was able to consult talked about style or presentation. The style that was pictured in the books was Traditional. 

In my own defense, I am married to an engineer and my dad would have been a wonderful engineer had he gone to college after his discharge from the US Navy. During my school years, most of my friends were the guys; I could help them with their cars because I knew what the tools were (thanks, Daddy and Pappo). Very early in my relationships with the males in my life, I learned to qualify and quantify my statements. Truthfully, I enjoy the banter and mental exercise to "protect" myself. This also leads to an odd sense of humor; I'm not a great punster but I enjoy puns as I think they are one of the highest forms of humor.

I discovered through trial and error that if I tatted chains and started the chain with the second half of my double stitch and continued that all picots on either rings or chains would point into the same "plane." This also helped reduce the potential for "gaposis" between elements. The picots would appear between full double stitches on the front side. After enrolling in the Tatters Across Time Proficiency Program in 2002, the Glossary termed this as Front-Side/Back-side tatting. Jan's Way from Jan Stawasz' (1947-2013) books showed a really impressive although confusing series of diagrams.

To visualize the difference without a picture, put your hands in front of you but have one hand palm-side up and the other hand palm-side down. Slightly bend your fingers. Now, think of this as a piece of tatting with your fingers being the decorative picots. See how, on one hand, the picots (fingers) are pointing upwards but on the other hand, the fingers (picots) point downward. This would be the view, on edge, of a tatted point. I find this manner to be more difficult to block. If you turn both hands so that the palms are facing the same direction, voila! the fingers (picots) are all pointing in the same direction. I find that tatting my pieces in an FS/BS manner, the piece is easier to block. It is also easier to determine how to lay out a flat piece. 

One last thought. I see where many people need to mark which side is the right side but I would ask one question. Have they ever run their fingers over their tatting on both sides? When doing FS/BS, the back side of the piece will be smoother while the front side has a definite textural feel. We sometimes think of doilies and motifs as being two-dimensional. In addition to a width and length (square, rectangular, or oval) or a diameter (circular), there is a third dimension which is represented in height from the size of the thread being used. That "depth" or texture is more prevalent when tatting FS/BS. 

If you decide to explore the FS/BS style of tatting, you will quickly feel the differences, and marking the piece will no longer be necessary but at the start of a piece may help until the smoothness of the back-side is evident. Just remember, there is no right way or wrong to create a double stitch. Regardless of the tool (fingers, needle, or shuttle) to manage thread or how you tat (Reverse Riego, Needle, Slip 'n Slide, etc.), tatting is a wonderful way to pass the time and create beautiful lace at the same time.

As you can tell, I enjoy writing and hope to share some of the knowledge and know-how that I have gained through the many years of crafting, especially various fiber arts. 

Monday, January 16, 2023

Yet another New Year's Resolution to be ignored!

 I resolved at the end of 2021 to post more frequently on my blog but as you can tell I've not done so. I'll start out (at least in January) in 2023 and try to post more frequently here as opposed to spending so much time on other social media sites.

The photo on the right is of the three entries in JaneE's "Tat It and See" for 2023 and is through the pattern to Day Two. More information about this fun activity for 2023 as well as previous TIAS, click on the link above. It's really fun to see all the entries from around the tatting world and everyone's guess what the TIAS will be up to the last day when Jane releases the final pattern portion for the year. 

The thread I've chose to use is all Lizbeth size 20 although the white is a cone that I bought from Debbie Arnold back in 2014 when she still had her DS9 Designs business. It is nicely mercerized and doesn't twist too much. Unlike Lizbeth 20 #601 - Snow White which has a white dye added before the gauzing step in the process. The cone thread has a slightly softer hand than the Snow White so I like it for testing as well as small angels and a cone makes a LOT of snowflakes, angels, and some beautiful doilies!

The brown thread is Lizbeth 20 #692 - Mocha Brown. This one is visibly smaller in diameter than the other two threads that I am using. As I have shared earlier with a number of folks, to get the deeper colors (blacks, purples, browns, navy blue, etc), the "cuticle" in the cotton substrate is opened and the deep dyeing process will damage the substrate. When the thread comes out of the dyeing process, it is further processed in a dyebath that sets the color and closes the cuticle before the thread is sent through the mercerizing process (the strands are twisted together, gas singed, and then wound onto balls). The information about dyeing comes from a long-time career where I was a Product Stewardship Assistant to a major global specialty chemical company.

The pink colorway is Lizbeth size 20 #176 - Pink Blossom which Handy Hands website describes as being Azalea Pink Medium to Very Light (coordinating with #620 - Azalea Medium and #629 - Azalea Light). I do see at least three pink values with the lightest value being nearly white. I like the monochromatic colorways (like the Pink Blossoms) as opposed to variegated ones (like Lizbeth #103 - Tutti Fruitti) as I find the repeat length more pleasing to my own eyes but using variegation where there are separate colors "bleeding" into one another to be garish, but that's just my own personal preference.

I'll post in a day or so some of my thoughts and hints about tatting front-side/back-side (FS/BS), which is my personal preference. There are special considerations whenever colorways, two colors, and even the shape of rings. These thoughts can even be pertinent to a tatter who does not tat using FS/BS.